HubSpot modules act as a powerful element of HubSpot CMS. Yes! HubSpot CMS provides various predefined modules and reusable fields and can be added to the pages through a drag and drop approach. These modules are commonly used for designing a perfect web page.
But as the demand of people is increasing, many organizations and developers prefer creating their modules to give an awful user experience to their viewers. Thanks to HubSpot and external assets that made the creation of UX modules possible.
Module files are basically the blocks that allow you to add content, functionality, and styling to different pages, email templates, and blogs.
Whenever we create or manage modules, then it can be created using three different forms, including:
- HTML + HubL (module.html
- CSS (module.css)
- JavaScript (Module.js)
Well! The HubSpot module has two parts; user interface and HTML+HubL template. If your user interface is appealing, then you can easily grab the audience's attention.
User experience includes things like sliders, animations, effects, and the smooth workflow of web pages. But this is only possible with JavaScript code and external assets.
The people commonly use these external assets because it does not need any coding. You can see a lot of JavaScript libraries, plugins, source code, animations, etc., available on the internet, which can be used in HubSpot modules and can further boost the user experience.
Indeed, creating high UX modules in the HubSpot boilerplate is not easy, but external assets made it possible. Don't know how to proceed with the same? Need not fret! This blog is for you.
Here, you will learn to use external assets links and files in HubSpot boilerplate and make high UX modules that can be reused. To make you better understand, I will explain the steps of creating an attractive testimonial slider using external assets.

Now, without any further delay, let's jump onto the process.
Steps to create Testimonial Slider Module in HubSpot Boilerplate
Testimonial Slider is one of the most common modules required by organizations or website owners. This module helps in showing the client reviews in the form of images, videos, or textual content.
If this module is presented in a user-friendly, modern and beautiful way, then it will not only grab the attention of visitors but also saves a lot of vertical space.
So, are you excited to create this module in HubSpot boilerplate? Let's get started….
Step 1 Firstly, we need owl carousel assets( external file) i.e., CSS and js file, which will help us in making testimonial slides. Obviously, you can use other external assets as well. But I usually choose this as it's easy to download and simple to use.
So, if you also want to download this owl carousel asset, then you can visit the link- https://owlcarousel2.github.io/OwlCarousel2/demos/demos.html. Moreover, you can also use the CDN link of these files.
Make sure you add owl-carousel.css and owl-carousel.js files in your website Head tag. Also, in the boilerplate, don't forget to add these files in the base.html file, as shown in the image below.
Step 2 Once all the carousel files are added, it's time to add jQuery in your base.html file. This step is followed just because all the functionalities commonly work with jQuery.

Step 3 After adding owl-carousel files, let's create a module.
Step 4 Navigate to the html+HubL section of the module, take a div tag and give it a class" owl-carousel owl-theme." Now, take one more div and give it a class item.
For all the content that you want to add in the slider, make sure you add it under the item class.
Here is the code-
<div class=””owl-carousel owl-theme>
<div class=”item”>
Here, add your content like image, text, and video, etc.
</div>
</div>
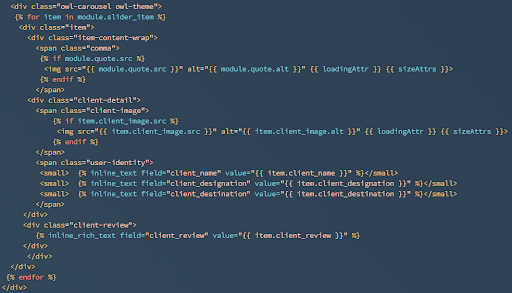
The best part about the HubSpot module is that you can enable a loop for fields so that you don't need to write item class again and again. You can repeat the field and use the item. You can add, delete, edit the content which is included in the loop HubL code as shown below-

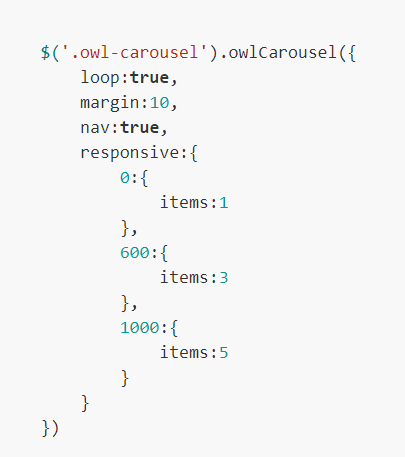
Step 5 Now, it's time to use javascript code for the slider. Many of you might be wondering about how to do that. Well! All the code is provided to you.
You just need to copy the code from the link here- https://owlcarousel2.github.io/OwlCarousel2/demos/basic.html. Once the content is copied, make sure you place it in your module.
Have a look at the below screenshot to know about-

Step 6 After following all the above steps, your slider will start its functionality. Now, you can show your creativity in styling the content by CSS code. Having accurate sliders and an excellent creative style will help you in making perfect testimonial sections for your website.
A perfect slider and good creative style will surely make your testimonial section look more appealing.
Step-7 Just like the above steps, you can also find many attractive assets and awesome plugins on the internet. Just add their links in the <head> tag of your webpage. The benefits of using external assets and plugins are preferred to increase productivity by reusing the code.
The final Say
Hopefully, the above points will allow you to create excellent UX modules in HubSpot Boilerplate using external assets. Now that you know how to create modules in HubSpot, it's time to do some practical and make one of your own.
Still, if you have concerns, feel free to contact our HubSpot experts and get a free consultation.
Editor- Divya Verma
Frequently Asked Questions
How do I import a module into HubSpot?
To bring a module into HubSpot, follow these steps. Access the design manager to include modules in templates. However, to add a module to your local template, employ HubL. Start by opening the code editor. Navigate to the templates folder and locate the home.html file. There, you can insert the module seamlessly.
What are HubSpot modules?
HubSpot modules are like building blocks for websites. They are reusable pieces that you can use in web designs. You can easily add them to web pages using drag-and-drop features or arrange them in flexible columns. HubSpot offers various modules, but you can also design your custom ones. These modules serve a wide range of purposes, from showcasing testimonials to creating beautiful photo galleries. It makes website creation and design more efficient, allowing for flexibility and customization to meet your specific needs.
What is HubSpot Design Tools?
HubSpot Design Tools is an integrated platform that brings together the essential tools for website design. It caters to both designers and marketers, offering a wide range of features. Designers can harness these tools to craft cutting-edge websites, while marketers can maintain the flexibility they need for content creation. HubSpot's design manager is a holistic solution, streamlining the website design process to empower both creative designers and content-focused marketers with the tools they need for a successful online presence.
What is a HubSpot boilerplate?
A HubSpot boilerplate is like a blueprint for creating websites on HubSpot CMS. It gives developers a head start and shows them how to follow the best practices. It's a handy tool for quickly setting up websites on the HubSpot CMS platform, helping developers get started efficiently and make websites that work well.


